1 Where to Find Contacts in GHL
The Contacts section is where all client and enquiry records are stored. VATable currently has 660+ contacts in the system.
Navigation
- Log in to GoHighLevel at link.thecarepro-ai.co.uk.
- In the left sidebar, locate the Contacts icon (it looks like a person silhouette). Click it.
- You will land on the Smart Lists view, showing the "All" contacts list by default.
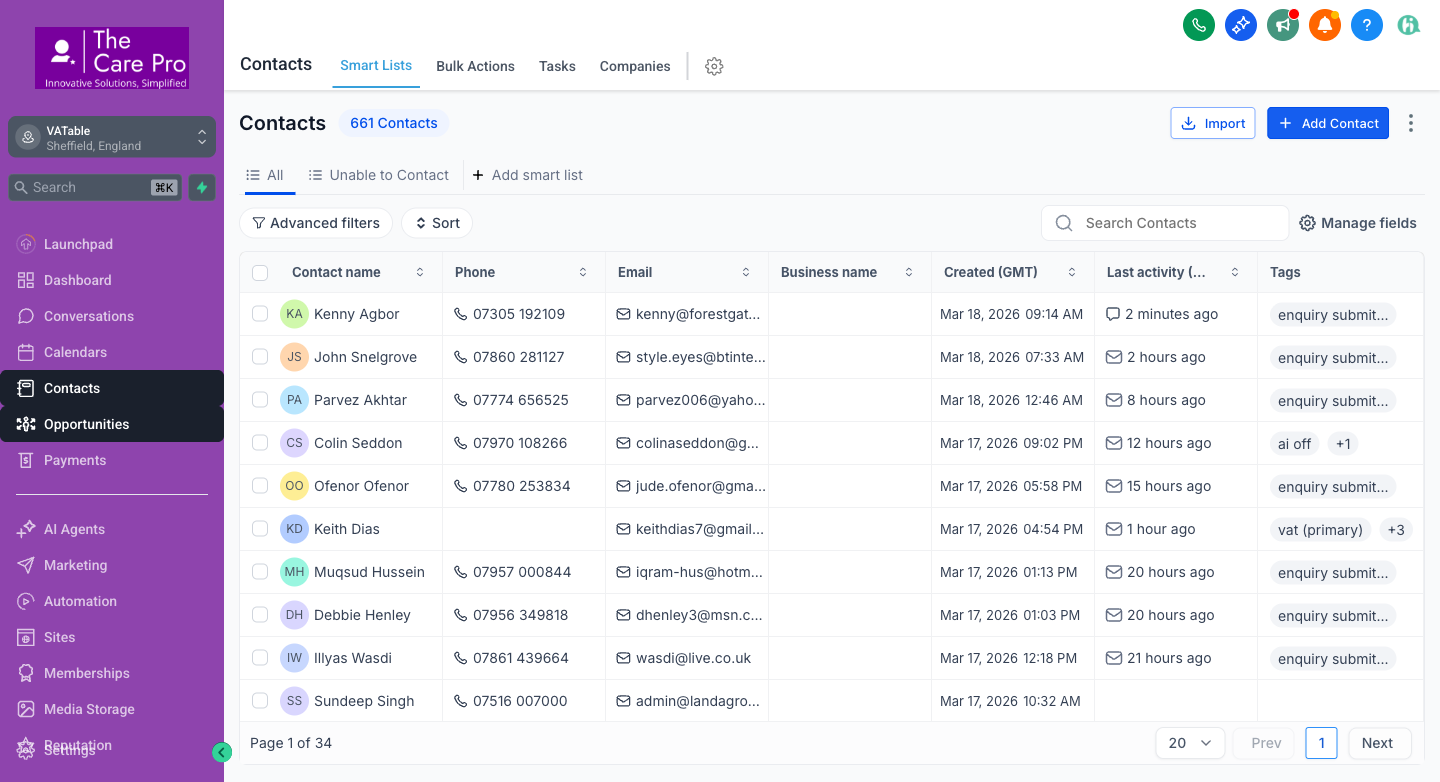
Top navigation tabs on the Contacts page
| Tab | What It Shows |
|---|---|
| Smart Lists | Filtered views of contacts. The "All" list shows every contact. The "Unable to Contact" list shows contacts with delivery failures. |
| Bulk Actions | Tools to update, tag, or email multiple contacts at once. Use with care. |
| Tasks | View all tasks assigned across contacts (useful for checking outstanding work). |
| Companies | Company records linked to contacts. |
2 Searching for a Contact
There are several ways to find a specific contact:
Method 1: Search Box (Quick Search)
- On the Contacts page, find the "Search Contacts" box in the top-right area of the contact list.
- Type the contact's name, email address, or phone number.
- The list filters in real-time as you type. Click the contact's name to open their record.
Method 2: Global Search (Cmd+K)
- Press Cmd + K (Mac) or Ctrl + K (Windows) from any page in GHL.
- Type the contact's name or email in the search bar that appears.
- Click the contact from the dropdown results to jump directly to their record.
Method 3: Advanced Filters
- On the Contacts page, click the "Advanced filters" button (left side, below the tabs).
- Choose filter criteria such as:
- Tags - e.g., filter for all contacts tagged "vat (primary)"
- Contact Owner - e.g., show only Ian Sutton's contacts
- Date Created - e.g., contacts added this week
- Custom Fields - e.g., contacts with a specific Engagement Expiry Date
- Click "Apply" to filter the list.
Method 4: Sort the List
Click the "Sort" button next to Advanced Filters to sort contacts by name, creation date, or last activity. You can also click any column header to sort by that column.
3 The Contact Record Overview
When you click on a contact's name in the list, you open their full contact record. This is the central hub for all information about a client or enquiry.
Contact Record Layout
The contact record is split into two main areas:
- Left panel - The contact's basic information (name, email, phone, tags, owner, address) and quick-action buttons (call, SMS, email).
- Right panel - Tabbed content area with detailed views.
Available Tabs
| Tab | What You'll Find |
|---|---|
| General Info | Contact details (name, email, phone, address, company), custom fields (Engagement Expiry Date, Monthly Care Fee, etc.), and DND (Do Not Disturb) settings. |
| Notes | All notes for this contact - both manually added and auto-generated by workflows (e.g., WF8 64-8 note). Displayed in reverse chronological order. |
| Activity | Full audit trail: emails sent/received, calls, SMS, notes added, workflow triggers, opportunity stage changes, and more. |
| Conversations | All message threads (email, SMS, WhatsApp, web chat) between the team and this contact. |
| Appointments | Scheduled and past appointments/meetings for this contact. |
| Tasks | All tasks assigned to team members for this contact (e.g., follow-up tasks from automations WF7, WF10, WF11, WF12). |
| Opportunities | All opportunities (pipeline deals) linked to this contact. Shows pipeline name, stage, and value. |
| Payments | Invoices, transactions, and payment history for this contact. |
4 How to Add a Note to a Contact
Notes are used to record important information about a client's case, conversations, or status changes. Notes appear in the Activity tab and the Notes tab.
Adding a Note Manually
- Open the contact's record by clicking their name in the Contacts list.
- Click the "Notes" tab in the contact record.
- You will see a text area at the top with placeholder text "Add a note...".
- Click into the text area and type your note. You can use basic formatting (bold, italics, bullet points).
- Click the "Add Note" button (or press Ctrl+Enter) to save.
- The note appears immediately at the top of the notes list, timestamped with your name as the author.
What to Include in a Note
- Case updates - e.g., "Spoke with HMRC re: VAT assessment. Awaiting response by 25/03."
- Client instructions - e.g., "Client confirmed they want to proceed with TTP arrangement."
- Internal handoff info - e.g., "Handing over to Charles for engagement review."
- Meeting summaries - e.g., "Initial consultation completed. Client has 3 years of outstanding VAT returns."
Quick Note from Activity Tab
You can also add a note from the Activity tab by clicking the "Add Note" icon (a pencil/notepad icon) at the top of the activity feed. This creates the same type of note.
5 Understanding Auto-Logged Notes
Some notes in GHL are created automatically by workflows. These are important to recognise because they record key events without manual input.
WF8: 64-8 Signed Note
{{opportunity.per_month_for}} to record the monthly care fee amount.How to Identify Auto-Logged Notes
- Author name: Auto-logged notes typically show "Workflow" or "System" as the author, rather than a team member's name.
- Consistent format: Automated notes follow a template format (e.g., always starting with "64-8 Signed" or similar standard phrasing).
- Timing: They appear at the exact moment a workflow trigger fires, often at odd hours or immediately after a form submission.
Other Automated Activity
Besides notes, workflows also create other activity entries visible on a contact:
- Tag additions - e.g., "enquiry submitted" added when a form is submitted
- Opportunity stage changes - e.g., moved from "Engagement Signed" to Case Management pipeline
- Task creation - e.g., WF7 creates a task for Ruby when Service Completed
- Email sends - e.g., proposal emails sent by WF2
6 How to Update Contact Information
Keeping contact information up to date is essential for accurate communications and automations.
Editing Basic Fields
- Open the contact's record by clicking their name in the Contacts list.
- On the left panel, you will see the contact's name, email, phone, and address.
- Click on any field value to edit it. For example, click on the phone number to change it.
- Type the new value and press Enter or click away to save. Changes save automatically.
Editable Standard Fields
| Field | Where to Find It | Notes |
|---|---|---|
| First Name / Last Name | Top of left panel | Used in email merge fields like {{contact.first_name}} |
| Left panel, below name | Primary email for all communications. Ensure it is correct. | |
| Phone | Left panel, below email | Used for SMS automations and call logging. |
| Address | Left panel, "Address" section | Includes Address Line 1, City, State/County, Postcode, Country. |
| Company Name | Left panel or General Info tab | The client's business name. |
| Date of Birth | General Info tab | Optional field. |
| Source | General Info tab | Where the lead came from (website, referral, etc.). |
7 How to Update Custom Fields
Custom fields are special fields created specifically for VATable's workflow. Several of these fields drive automations - if they are not filled in, the relevant workflow will not fire.
Where to Find Custom Fields
- Open the contact's record.
- Click the "General Info" tab (or scroll down in the left panel - depending on your GHL layout, custom fields may appear in either location).
- Scroll down past the standard fields to find the "Additional Info" or "Custom Fields" section.
- Click on any field to edit its value.
Custom Fields Guide
| Field Name | Type | Purpose | Drives Automation? |
|---|---|---|---|
| Engagement Expiry Date | Date (calendar picker) | The date when the client's current engagement letter expires. Click the field to open a calendar picker and select the date. | YES - WF9 & WF12 |
| Engagement Warning Date | Date (calendar picker) | Must be set to exactly 7 days before the Engagement Expiry Date. This is a manual calculation because GHL's date reminder trigger has no offset feature. | YES - WF12 (Ruby warning task) |
| Case Management Type | Radio / Dropdown | Specifies the type of case: VAT, Time to Pay (TTP), Direct Tax, or Miscellaneous. Determines which Case Management pipeline stage the contact enters. | Indirectly - pipeline routing |
| Monthly Care Fee | Monetary (£) | The agreed monthly fee for ongoing case management. Used in merge fields for documents and invoicing. | Indirectly - WF8 merge field |
How to Set a Date Field
- Click on the date field in the contact record. A calendar picker will appear.
- Navigate to the correct month using the left/right arrows.
- Click the day to select it.
- The date saves automatically once selected.
How to Set a Monetary Field
- Click on the monetary field (e.g., Monthly Care Fee).
- Type the amount as a number (e.g.,
250for £250). Do not include the £ sign. - Press Enter or click away to save.
8 The Activity Tab
The Activity tab provides a complete audit trail of everything that has happened with a contact. It is the most detailed view available.
What Shows Up in the Activity Tab
| Activity Type | Icon | Description |
|---|---|---|
| Email Sent | Envelope icon | Outbound emails (manual or automated). Shows subject line, recipient, and open/click status. |
| Email Received | Envelope icon (incoming) | Inbound emails from the contact. |
| SMS Sent/Received | Chat bubble icon | Text messages sent to or received from the contact. |
| Call Logged | Phone icon | Inbound or outbound calls, including duration. |
| Note Added | Notepad icon | Manual or automated notes (see Section 4 & 5). |
| Tag Added/Removed | Tag icon | When a tag is added or removed (manually or by workflow). |
| Opportunity Created/Updated | Pipeline icon | When an opportunity is created, or its stage/status changes. |
| Workflow Triggered | Automation/gear icon | When a workflow enrols or performs an action on this contact. |
| Task Created | Checkmark icon | When a task is assigned (manually or by automation). |
| Form Submitted | Form icon | When the contact submits a form (e.g., enquiry form on website). |
| Document Signed | Document icon | When the contact signs a document (e.g., 64-8 form, engagement letter). |
Filtering the Activity Tab
The Activity tab can become very long for active contacts. Use the filter options at the top of the activity feed to show only specific types:
- All - Everything (default)
- Notes - Only notes
- Calls - Only phone calls
- Emails - Only email activity
- Tasks - Only task-related activity
9 Tags on Contacts
Tags are labels attached to contacts that categorise them and drive automations. VATable uses 47 tags across the system. Here are the most important ones:
| Tag | Meaning | How It Gets Applied |
|---|---|---|
| enquiry submitted | Contact submitted an enquiry form on the VATable website. This is the most common tag (applied to ~500+ contacts). | Automatically, when the enquiry form is submitted. |
| engagement-letter-sent | An engagement letter has been sent to this contact. Used as a guard to prevent duplicate sends. | Automatically by the proposal/engagement workflow. Can also be added manually. |
| nmf-cleared | "Not Moving Forward" - cleared. The contact has been removed from all active workflows. This is the "kill switch" tag added by WF13. | Automatically by WF13 when an opportunity moves to "Not Moving Forward". |
| vat (primary) | The contact's primary case type is VAT-related. | Manually by the team, or via form data. |
| proposal sent | A proposal has been sent to this contact. | Automatically when the proposal workflow runs. |
| proposal email opened | The contact opened the proposal email. | Automatically by email tracking. |
| ai off | AI-powered responses are disabled for this contact. | Manually by the team. |
Adding a Tag Manually
- Open the contact's record.
- In the left panel, find the Tags section (below the contact's basic info).
- Click the "+" icon or the "Add Tag" area.
- Type the tag name. If it already exists, select it from the dropdown. If it is new, type the full name and press Enter.
- The tag is saved immediately.
Removing a Tag
- In the Tags section, hover over the tag you want to remove.
- Click the "x" button that appears on the tag.
- The tag is removed immediately.
10 Manually Assign or Change Contact Owner
The Contact Owner determines which team member is responsible for the contact. It also controls who receives automated tasks created by workflows like WF7, WF10, WF11.
Changing the Contact Owner
- Open the contact's record.
- In the left panel, find the "Assigned To" or "Contact Owner" field. It shows the current owner's name (or "Unassigned").
- Click on the owner's name to open a dropdown of all team members.
- Select the new owner from the dropdown list.
- The change saves immediately.
Available Team Members
The following team members can be set as contact owners:
- Charles Dobson - Director, handles post-engagement cases
- Ian Sutton - BDM, handles initial enquiries and consultations
- Ruby Campbell - Administration, handles invoicing and end-of-engagement tasks
- Ben, David, Finn, Jock, Kathryn, Sam, Sian, Steve, Stuart, Luke - Case workers
11 Contact Owner Rules
VATable follows specific rules for contact ownership that align with the sales and case management process:
| Stage | Owner | Reason |
|---|---|---|
| New Enquiry (Enquiries / Follow Up) |
Ian Sutton | Ian is the Business Development Manager. All new enquiries are auto-assigned to Ian for initial consultation and follow-up. |
| Proposal Stage (Draft Proposal / Proposal Sent) |
Ian Sutton | Ian continues to own the contact through the proposal process. |
| After Engagement Signed | Charles Dobson | Once the client signs the engagement letter, ownership transfers to Charles for case management oversight. |
| Case Management (VAT / TTP / Direct Tax) |
Assigned case worker | Charles may reassign ownership to the specific case worker handling the matter. |
| Not Moving Forward | Unchanged | Owner remains as-is, but WF13 removes the contact from all workflows and adds the "nmf-cleared" tag. |
12 How to See All Tasks for a Contact
Tasks are action items assigned to team members. Several VATable workflows create tasks automatically:
- WF7 - Creates a task for Ruby when "Service Completed"
- WF10 - Creates an invoice generation task for Ruby at "End of Engagement Review"
- WF11 - Creates an owner review task when entering a Case Management stage (2-day due date)
- WF12 - Creates a warning task for Ruby when the Engagement Warning Date arrives
Viewing Tasks on a Contact
- Open the contact's record.
- Click the "Tasks" tab in the contact record.
- You will see all tasks associated with this contact, showing:
- Task title
- Assigned to (which team member)
- Due date
- Status (open, completed, overdue)
- Click on any task to view its details or mark it as complete.
Viewing Tasks Across All Contacts
To see all tasks across the entire system (not just one contact):
- Go to Contacts in the sidebar.
- Click the "Tasks" tab at the top of the Contacts page (next to Smart Lists, Bulk Actions, Companies).
- This shows all open tasks across all contacts, filterable by assignee and due date.
Completing a Task
- Open the task (either from the contact's Tasks tab or the main Tasks view).
- Review the task description and any related notes.
- Once the work is done, click the checkbox or "Mark as Complete" button.
- The task moves to the "Completed" section and is logged in the Activity tab.