Opportunities are where you track every client case from initial enquiry through to completion. They live inside Pipelines, which are visual boards showing what stage each case is at.
Step-by-step: Navigate to Opportunities
- Log in to GHL at link.thecarepro-ai.co.uk
- Make sure you are in the VATable sub-account (check top-left corner shows "VATable, Sheffield, England")
- In the left sidebar, look for Opportunities (it has a gear/cog icon with connecting dots)
- Click on Opportunities to open the Opportunities section

Once you click Opportunities, you will see two tabs at the top of the page:
- Opportunities - The kanban board view showing cards in columns (stages)
- Pipelines - A list of all your pipelines with their stage counts and last-updated dates
VATable uses 3 main pipelines to manage all client cases. Each pipeline has different stages (columns) that represent where a case currently sits in the process.
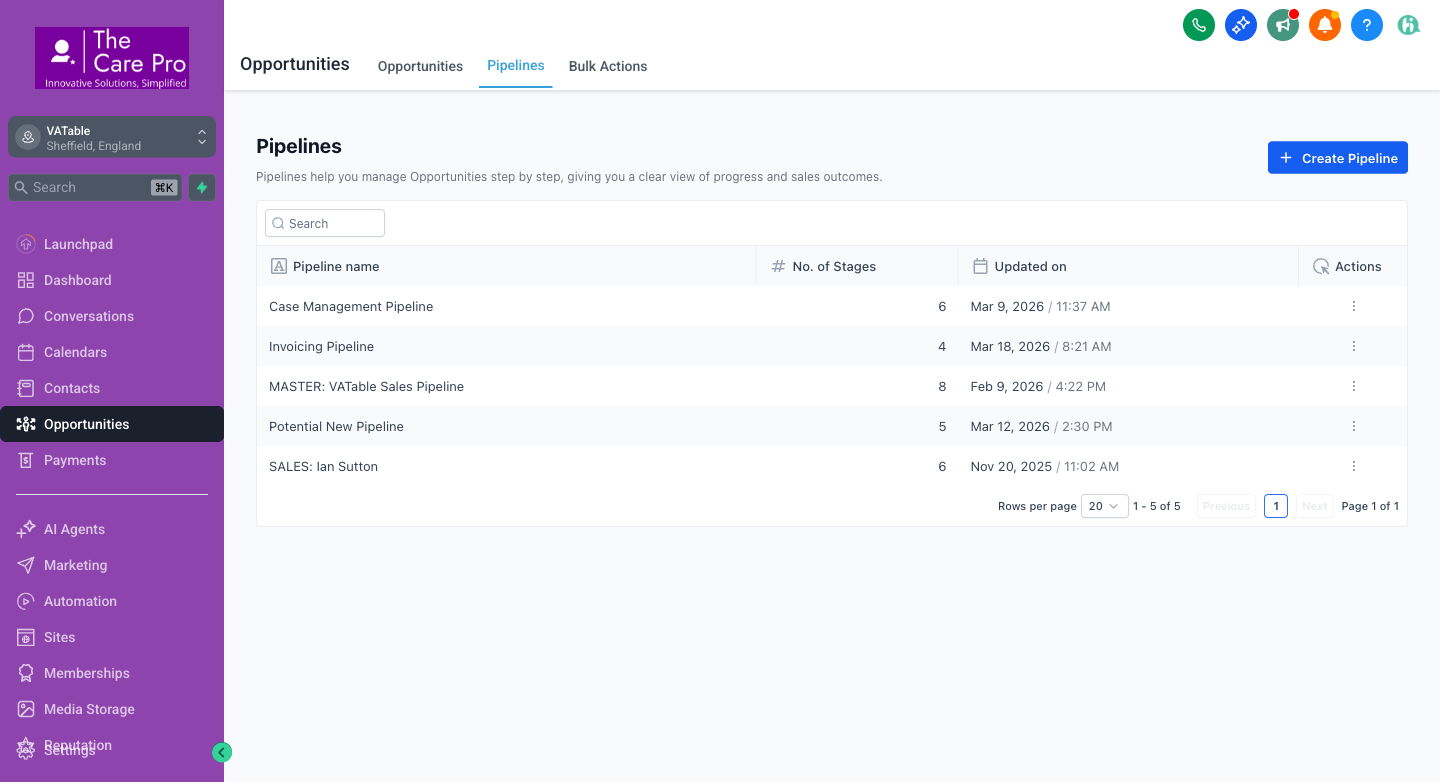
Pipeline 1: MASTER: VATable Sales Pipeline (8 stages)
This is the main sales pipeline tracking every enquiry from first contact to completion. It has 362+ opportunities.
| Stage | What it means |
|---|---|
| Enquiries | New leads that have come in via the website form, phone, or referral. Not yet contacted. |
| Follow Up | Initial contact made. Awaiting response or follow-up consultation scheduled. |
| Draft Proposal | Information gathered. Proposal/engagement letter is being drafted. |
| Proposal Sent | Engagement letter has been sent to the client for review and signature. |
| Engagement Signed | Client has signed the engagement letter. Case is active. Triggers move to Case Management. |
| Service Completed | Case work is finished. Triggers a task for Ruby Campbell for invoicing/wrap-up. |
| Ready for Testimonial | Invoice settled. Client can be asked for a Google review or testimonial. |
| Not Moving Forward | IRREVERSIBLE. The client has declined or is no longer proceeding. Moving here kills ALL automations (see Section 11). |
Pipeline 2: Case Management Pipeline (6 stages, ~£486K value)
This is where active cases are managed after a client signs the engagement letter. Cases are categorised by type.
| Stage | What it means | Typical count |
|---|---|---|
| Time to Pay | Client needs to arrange a payment plan with HMRC | ~14 cases |
| Direct Tax | Income tax, corporation tax, or capital gains tax case | ~31 cases |
| VAT | VAT dispute, assessment, or investigation | ~46 cases |
| Miscellaneous | Cases that don't fit the above categories | ~2 cases |
| End Of Engagement Review | Case approaching or past its engagement expiry date. Ready for review. | ~7 cases |
Pipeline 3: SALES: Ian Sutton (6 stages)
A dedicated pipeline for Ian Sutton's direct sales activities.
Switching Between Pipelines
On the Opportunities tab (the kanban board view), there is a pipeline selector dropdown at the top of the page. Click it to switch between viewing the MASTER pipeline, Case Management, or Ian Sutton's pipeline.
There are two ways to move an opportunity from one stage to another:
Method 1: Drag and Drop (Kanban Board)
- Navigate to Opportunities → Opportunities tab (the kanban board)
- Select the correct pipeline from the pipeline dropdown at the top
- Find the opportunity card you want to move
- Click and hold the card, then drag it to the desired column (stage)
- Release the card over the new column
- The opportunity will now appear in the new stage, and any automations tied to that stage will trigger automatically
Method 2: From the Opportunity Detail View
- Open the opportunity by clicking on its card (see Section 4)
- In the opportunity detail panel, look for the Stage dropdown field (usually near the top of the right-hand panel)
- Click the Stage dropdown and select the new stage
- The change saves automatically
There are several ways to open an opportunity record:
From the Kanban Board
- Navigate to Opportunities → Opportunities tab
- Select the relevant pipeline from the dropdown
- Find the opportunity card in the appropriate stage column
- Click on the opportunity card (the card itself, not the drag handle)
- A detail panel will slide open on the right side of the screen
From a Contact Record
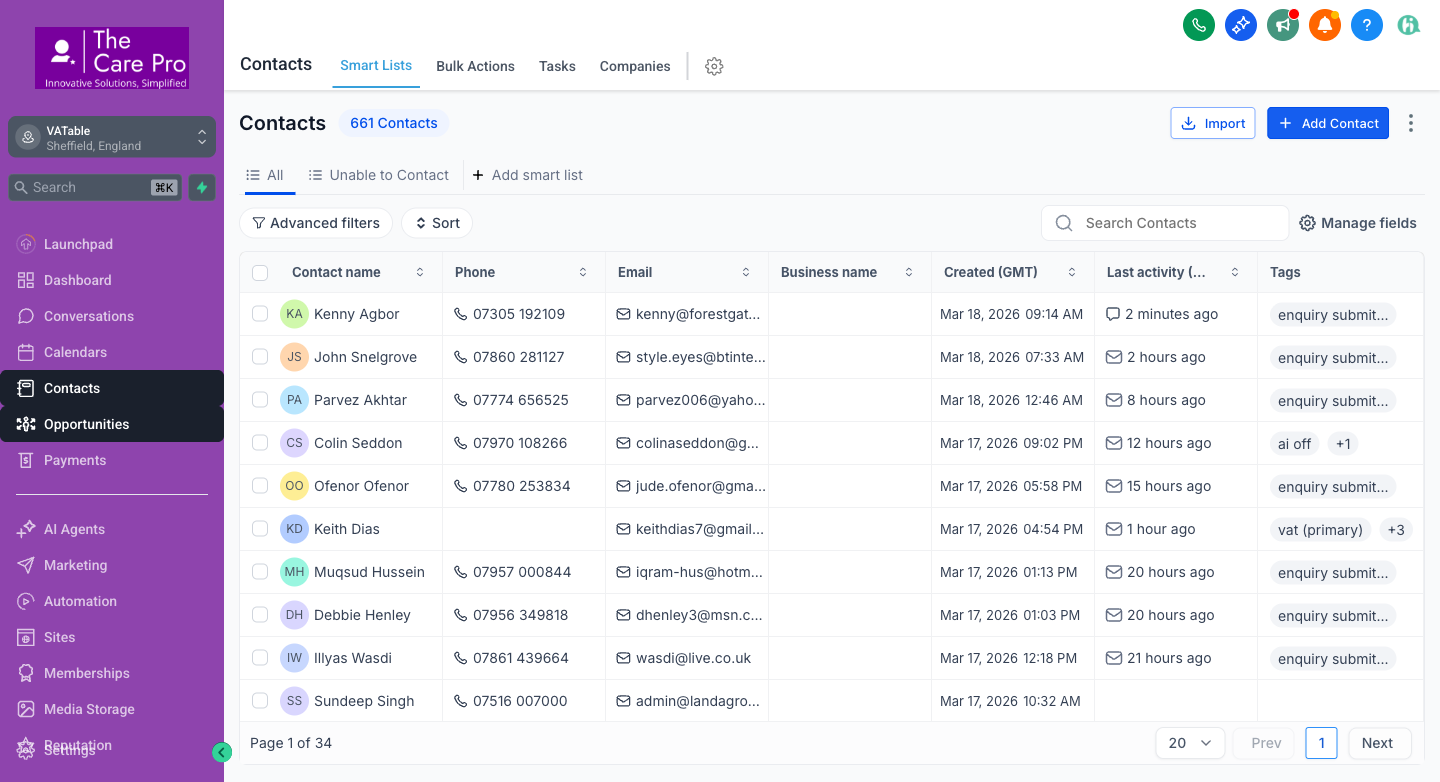
- Go to Contacts in the sidebar
- Find and open the contact
- In the contact detail view, scroll to the Opportunities section
- Click on the linked opportunity to open it
From the Search Bar
- Click the Search bar in the top-left sidebar (or press Cmd + K)
- Type the client name or company name
- Results will show matching contacts and opportunities
- Click the opportunity result to open it directly
- Contact name
- Opportunity value (monetary amount)
- Owner/assignee initials
- Tags and status indicators
- Date last updated
When you open an opportunity, you see a detail panel with several key sections:
Top Section: Overview
- Contact Name - The person or business linked to this opportunity
- Pipeline & Stage - Which pipeline and current stage (can be changed via dropdown)
- Opportunity Value - The monetary value of the case (e.g., monthly fee or one-time amount)
- Owner - The team member assigned to this case (e.g., Charles, Ian, Ruby, etc.)
- Status - Open, Won, Lost, or Abandoned
- Source - Where the lead came from (e.g., website, referral, paid ad)
Custom Fields
VATable has several custom fields on contacts and opportunities that are critical for case management:
| Field Name | Where it lives | Purpose |
|---|---|---|
| Engagement Expiry Date | Contact | When the engagement letter expires. Drives WF9 and WF12 automations. |
| Engagement Warning Date | Contact | = Expiry Date minus 7 days. Drives WF12 warning task for Ruby. |
| Monthly Care Fee | Contact | Recurring monthly fee charged to the client. |
| One Time Payment | Contact | One-off fee for the case. |
| Case Management type | Contact | Time to Pay, Direct Tax, VAT, or Miscellaneous. Determines Case Management stage. |
| Client Reference | Opportunity | Internal reference number for the case. |
Activity Feed & Notes
Below the fields, you will see the Activity feed, which shows:
- All notes added to the opportunity
- Stage changes (who moved it and when)
- Emails sent/received
- Tasks created and completed
- Workflow triggers and actions
Contact Details (Right Panel)
The contact information panel shows:
- Phone number (click to call)
- Email address (click to send)
- Tags applied to the contact
- All linked opportunities
Notes are essential for recording conversations, decisions, and updates on a case. There are two places to add notes.
Adding a Note to an Opportunity
- Open the opportunity (click its card on the kanban board)
- In the detail panel, look for the Notes section or the Activity tab
- Click "Add Note" or the notes icon
- Type your note in the text area
- Click "Save" or press Enter
- The note will appear in the activity feed with your name and a timestamp
Adding a Note to a Contact
- Go to Contacts in the sidebar
- Find and open the contact record
- In the contact view, click the Notes tab
- Click "Add Note"
- Type your note and save
- Record all phone call summaries with date and time
- Note any promises made to the client
- Record reasons for stage changes
- Note any issues or blockers
- Always include your initials if multiple team members work on the same case
{{opportunity.per_month_for}} is used in the auto-note for WF8.
Some fields are stored on the opportunity and others on the contact. Here is how to update each.
Updating Opportunity Fields
- Open the opportunity from the kanban board
- In the detail panel, find the field you want to update
- Click on the field value to make it editable
- Enter the new value
- Click away or press Tab to save
Updating Contact Fields
Many of VATable's key fields (Engagement Expiry Date, Monthly Care Fee, etc.) live on the contact record, not the opportunity. To update them:
- From the opportunity detail view, click the contact name to open their contact record
- In the contact record, look for the Custom Fields section (you may need to scroll down or click the "Additional Info" tab)
- Find the field you need to update (e.g., "Engagement Expiry Date")
- Click the field, enter the new value, and save
Key Fields and How to Set Them
| Field | Format | Example | Where |
|---|---|---|---|
| Engagement Expiry Date | Date picker | 30/09/2026 | Contact → Custom Fields |
| Engagement Warning Date | Date picker | 23/09/2026 (= expiry - 7 days) | Contact → Custom Fields |
| Monthly Care Fee | Currency (£) | £250.00 | Contact → Custom Fields |
| One Time Payment | Currency (£) | £1,500.00 | Contact → Custom Fields |
| Case Management type | Dropdown | VAT / Direct Tax / Time to Pay / Miscellaneous | Contact → Custom Fields |
| Opportunity Value | Currency (£) | £3,000.00 | Opportunity → Value field |
| Opportunity Owner | Dropdown (team member) | Charles Dobson | Opportunity → Owner field |
Example: If expiry = 30 September 2026, then warning date = 23 September 2026.
Tasks are to-do items you can assign to yourself or a colleague. They appear in the Tasks area and can have due dates.
Creating a Task from an Opportunity
- Open the opportunity from the kanban board
- In the detail panel, look for the Tasks section or click the "+" or "Add Task" button
- Fill in the task details:
- Title: A clear description of what needs to be done
- Assignee: Who should do this task (you or a colleague)
- Due Date: When it should be completed by
- Description: Any additional details or instructions
- Click "Save" to create the task
Creating a Task from the Contacts Page
- Go to Contacts in the sidebar
- Open the contact record
- Click the "Tasks" tab in the top navigation bar of the Contacts section
- Click "+ Add Task"
- Fill in the details and assign to the appropriate team member
Viewing All Tasks
- Go to Contacts in the sidebar
- Click the "Tasks" tab at the top of the page
- Here you can see all tasks across all contacts, filter by assignee, due date, or status
- WF7: When a case hits "Service Completed", a task is created for Ruby Campbell
- WF9: When engagement expiry date arrives, a task is created for the opportunity owner
- WF10: When a case enters "End of Engagement Review", an invoice task is created for Ruby
- WF11: When a case enters any Case Management stage, an owner review task is created (2-day due)
- WF12: 7 days before engagement expiry, a warning task is created for Ruby
The following fields MUST be filled for VATable's automations to work correctly. If these are left blank, workflows will fail silently and important tasks will not be created.
1. Engagement Expiry Date
| Field Name | Engagement Expiry Date |
| Location | Contact → Custom Fields |
| Format | Date (DD/MM/YYYY) |
| When to set | When the engagement letter is signed (i.e., when moving to "Engagement Signed" stage) |
| Drives workflows | WF9: Moves opportunity to "End of Engagement Review" + creates task for owner WF12: Creates a warning task for Ruby Campbell on the exact date |
2. Engagement Warning Date
| Field Name | Engagement Warning Date |
| Location | Contact → Custom Fields |
| Format | Date (DD/MM/YYYY) |
| When to set | At the same time as Engagement Expiry Date. Must be exactly 7 days before the expiry date. |
| Drives workflows | WF12: Creates a 7-day advance warning task for Ruby |
Expiry Date - 7 days manually. If you only set the Expiry Date and forget the Warning Date, Ruby will NOT get her 7-day advance warning.
3. Case Management Type
| Field Name | Case Management type |
| Location | Contact → Custom Fields |
| Options | Time to Pay | Direct Tax | VAT | Miscellaneous |
| When to set | When creating the Case Management opportunity, before placing it in the correct stage |
| Purpose | Determines which stage in the Case Management Pipeline the case should sit in |
4. Opportunity Owner
| Field Name | Owner (Assigned To) |
| Location | Opportunity record |
| When to set | When the opportunity is first created or assigned |
| Purpose | Several workflows create tasks for the opportunity owner. Without an owner, these tasks have no assignee and may be lost. |
5. Opportunity Value
| Field Name | Value (£) |
| Location | Opportunity record |
| When to set | When the proposal/engagement letter is drafted |
| Purpose | Used for pipeline value reporting and revenue tracking |
Quick Checklist: Before Moving to "Engagement Signed"
- Engagement Expiry Date is set on the contact
- Engagement Warning Date is set on the contact (= expiry minus 7 days)
- Case Management type is selected (VAT, Direct Tax, Time to Pay, or Miscellaneous)
- Opportunity Owner is assigned
- Opportunity Value is set
- Monthly Care Fee or One Time Payment is filled (as applicable)
When a client signs the engagement letter and the case is active, it needs to move from the MASTER: VATable Sales Pipeline to the Case Management Pipeline. Here is how:
Step-by-step Process
- Ensure all required fields are filled (see Section 9 checklist)
- In the MASTER pipeline, move the opportunity to "Engagement Signed" stage (this triggers Workflow 3: Documents Signed)
- Go to the Contact record for this client
- In the contact's Opportunities section, you will see the MASTER pipeline opportunity
- Create a new opportunity in the Case Management Pipeline:
- Click "+ Add Opportunity" or navigate to Opportunities and click "+ Add"
- Select Case Management Pipeline
- Set the stage based on the Case Management type:
- If type = "VAT" → place in VAT stage
- If type = "Direct Tax" → place in Direct Tax stage
- If type = "Time to Pay" → place in Time to Pay stage
- If type = "Miscellaneous" → place in Miscellaneous stage
- Set the value and owner
- Link it to the same contact
- The new Case Management opportunity will now appear on the Case Management kanban board
What Happens Automatically
- WF3 (Documents Signed) fires when the opportunity moves to "Engagement Signed" in the MASTER pipeline
- WF11 (Case Management Stage Entry) fires when the new opportunity is placed in a Case Management stage, creating an owner review task with a 2-day deadline
- WF9 (Engagement Expiry) will fire on the Engagement Expiry Date, moving the Case Management opportunity to "End of Engagement Review"
- Removes the contact from ALL active workflows - every running automation for this person stops immediately
- Adds the tag "nmf-cleared" to the contact - so it is clear the kill switch has been activated
- Move the opportunity back to an active stage
- Remove the "nmf-cleared" tag
- Manually re-enroll the contact in any workflows they should be in
When to Use "Not Moving Forward"
Only move an opportunity to NMF when you are certain the client is not going to proceed:
- The client has explicitly declined the proposal
- The client is unresponsive after multiple follow-up attempts over an extended period
- The case has been resolved outside of VATable
- The enquiry was not a genuine lead (spam, wrong number, etc.)
Step-by-step
- Confirm with your manager (ideally Charles) before moving to NMF
- Add a note to the opportunity explaining WHY the case is not moving forward
- Drag the opportunity card to the "Not Moving Forward" column, or change the stage dropdown
- The NMF Kill Switch (WF13) will fire automatically within seconds
What the NMF Kill Switch Does (WF13)
| Action | Detail |
|---|---|
| Remove from workflows | The contact is removed from ALL currently running workflows across MASTER and Ian Sutton pipelines |
| Add tag | nmf-cleared tag is added to the contact |
| Scope | Applies to opportunities in both MASTER: VATable Sales Pipeline AND SALES: Ian Sutton pipeline |
- The tag
nmf-clearedshould be visible on the contact - The activity feed should show "Removed from workflow" entries
Method 1: Global Search (Fastest)
- Click the Search bar in the top-left of the sidebar
- Or press Cmd + K (Mac) / Ctrl + K (Windows)
- Type the client name, email, or phone number
- Results appear instantly - click to jump to the contact or opportunity
Method 2: Contacts Search
- Navigate to Contacts in the sidebar
- Use the "Search Contacts" field in the top-right
- Type the name, email, or phone number
- The list filters in real time as you type
- Click a contact to open their record and see linked opportunities
Method 3: Advanced Filters
- Navigate to Contacts
- Click "Advanced filters" in the top-left area
- You can filter by:
- Tags (e.g., "enquiry submitted", "vat (primary)", "nmf-cleared")
- Pipeline & Stage (e.g., all contacts in "Proposal Sent")
- Owner/Assignee (e.g., all cases assigned to Charles)
- Custom fields (e.g., all cases with Case Management type = VAT)
- Date range (e.g., contacts created in the last 7 days)
- Click "Apply" to see filtered results
Method 4: Pipeline Board Search
- Navigate to Opportunities → Opportunities tab
- Select the relevant pipeline from the dropdown
- Use the search/filter bar at the top of the kanban board
- You can filter by owner, tags, or search by name
Method 5: Smart Lists
Smart Lists are saved filter views in the Contacts section. You can create Smart Lists for frequently used searches:
- Go to Contacts
- Apply your desired filters
- Click "+ Add smart list" tab at the top
- Name your smart list (e.g., "Active VAT Cases", "Expiring This Month")
- Save - it will appear as a tab you can click anytime
- "My Open Cases" - filter by Owner = You, Pipeline = Case Management, Status = Open
- "Awaiting Proposal" - filter by Stage = Draft Proposal or Proposal Sent
- "Expiring Soon" - filter by Engagement Expiry Date within the next 30 days
- "NMF This Month" - filter by tag = nmf-cleared, created date = this month